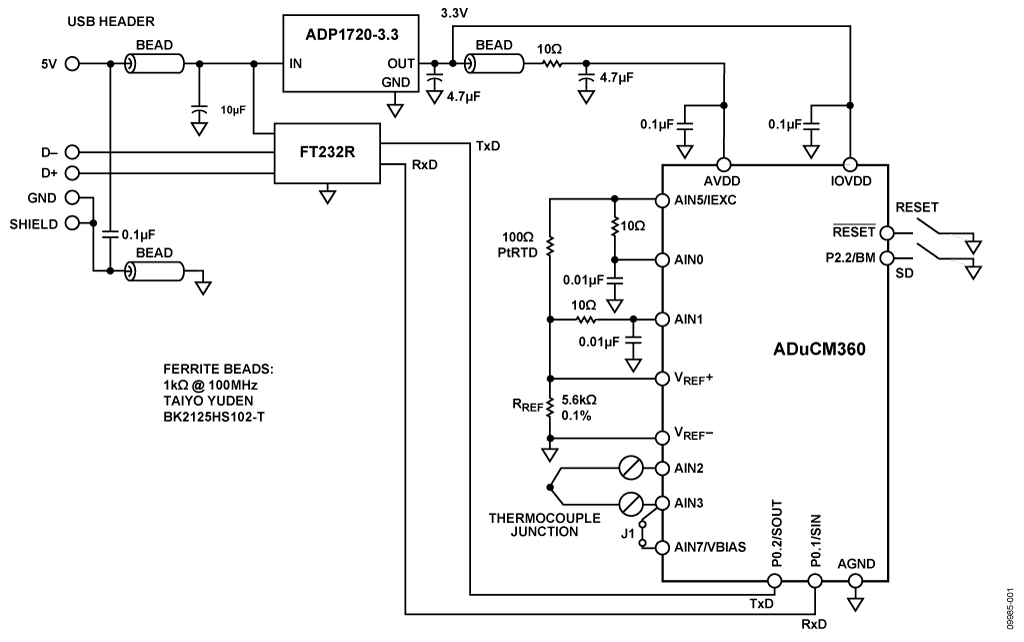
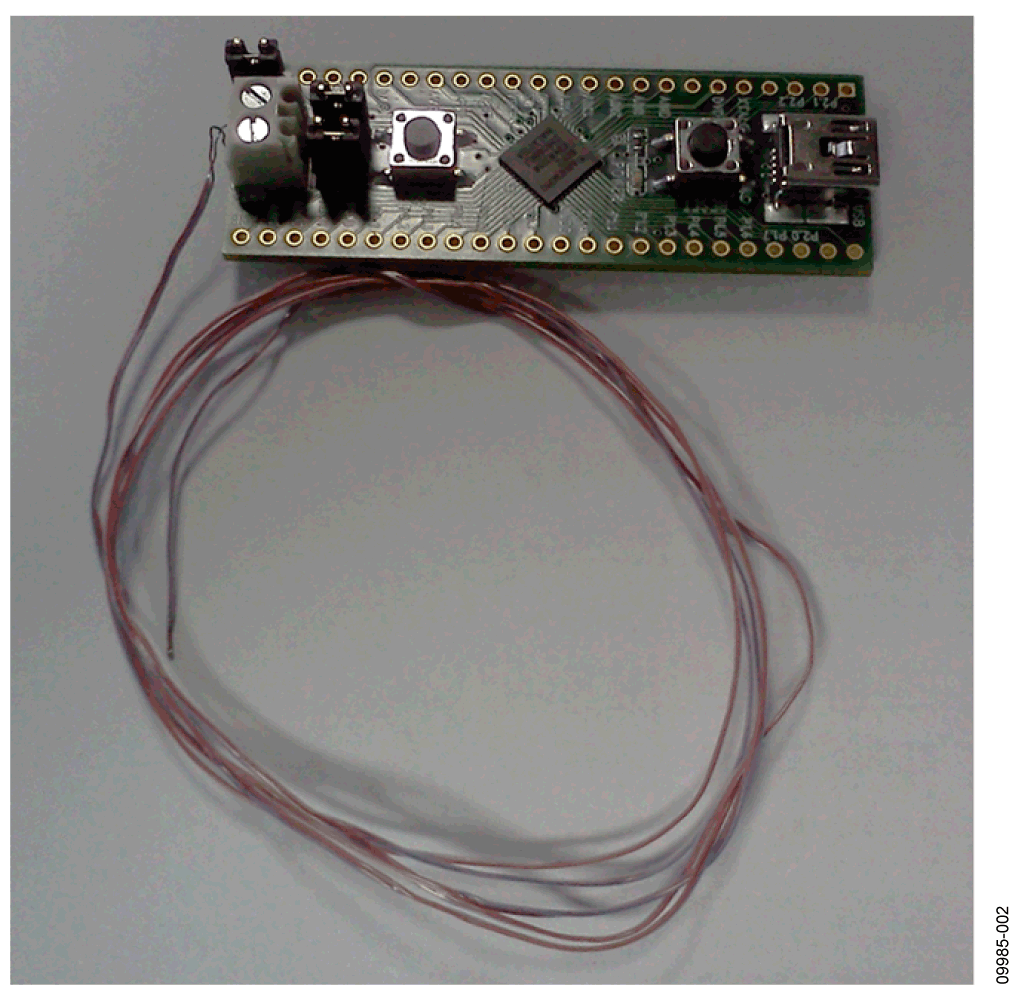
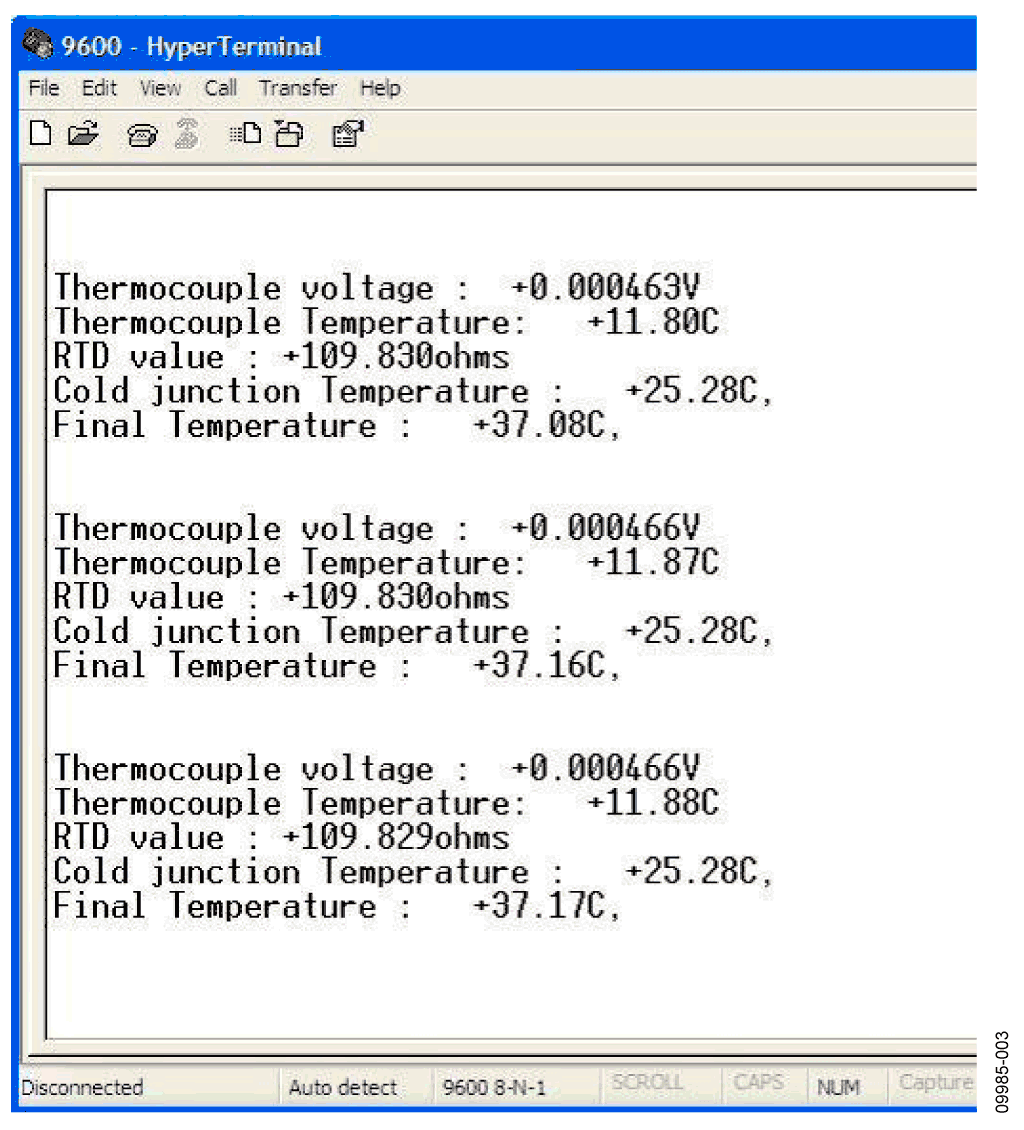
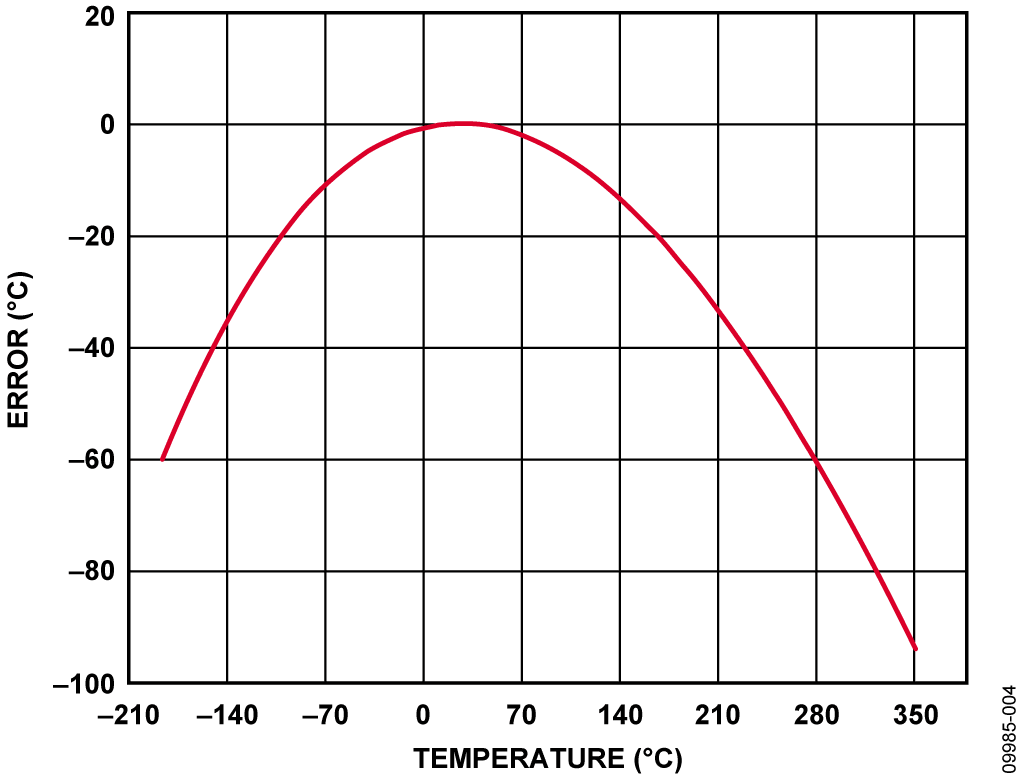
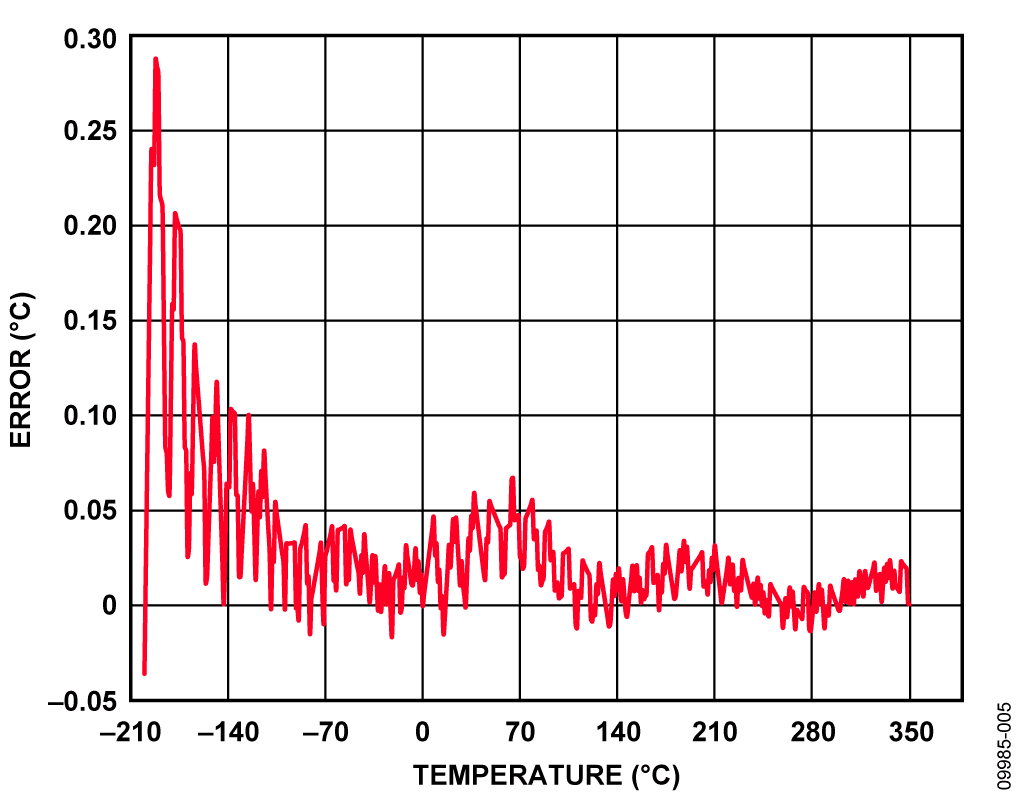
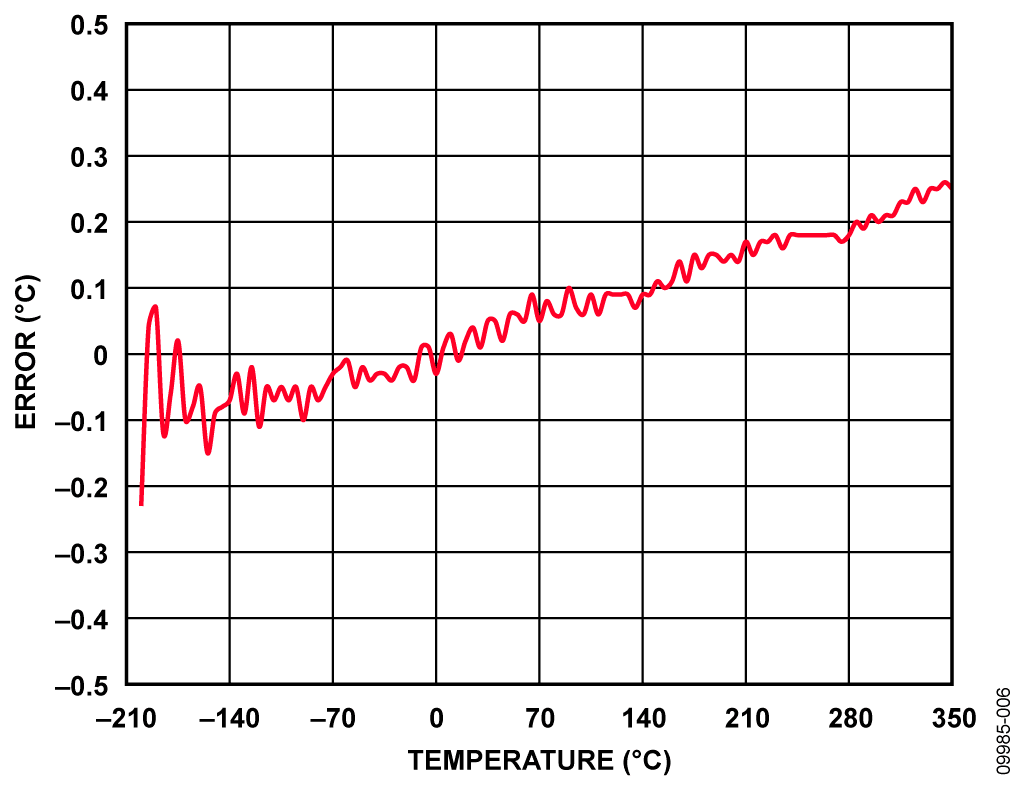
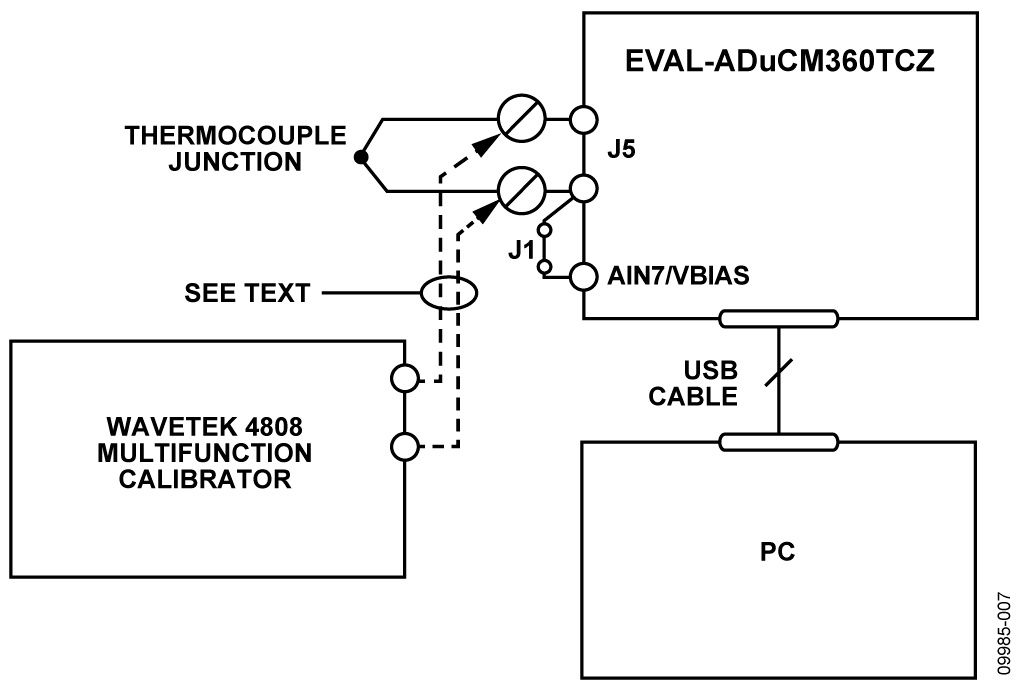
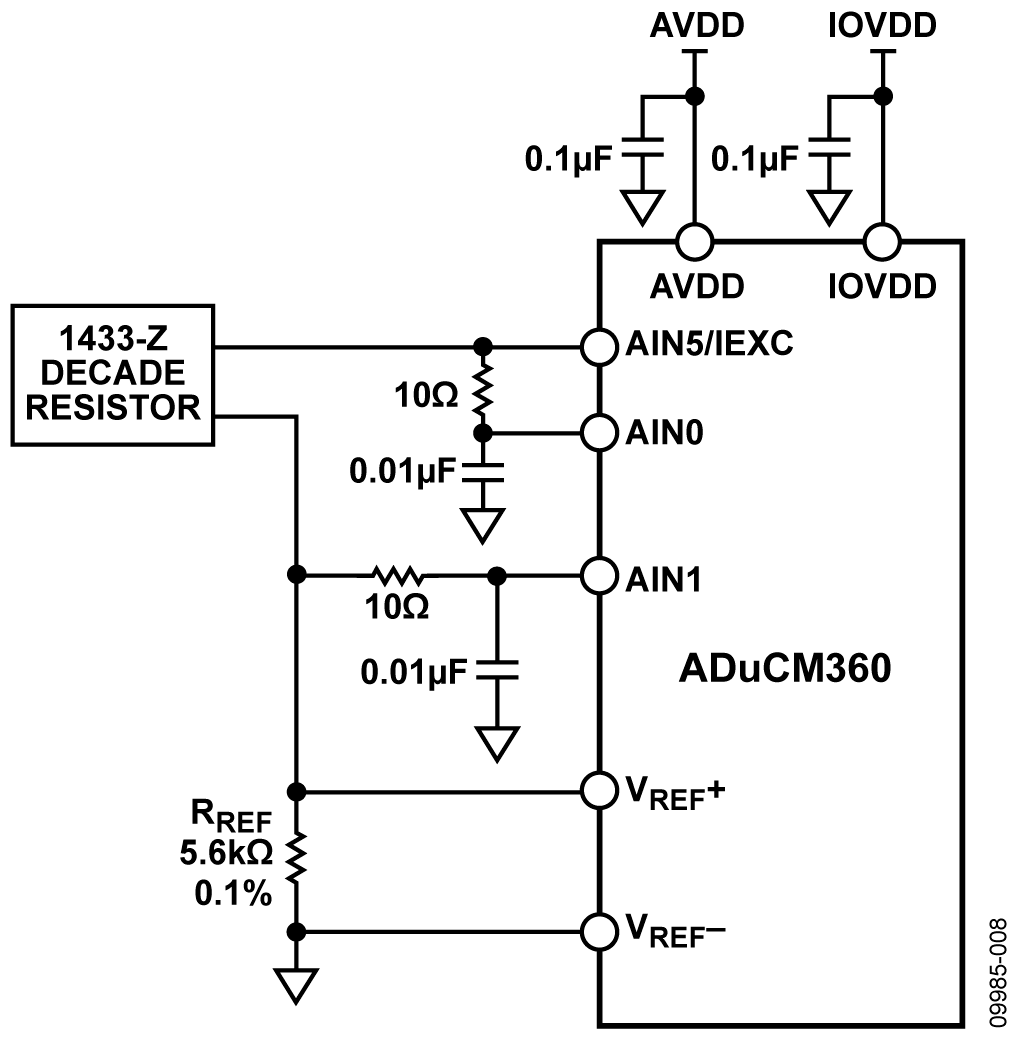
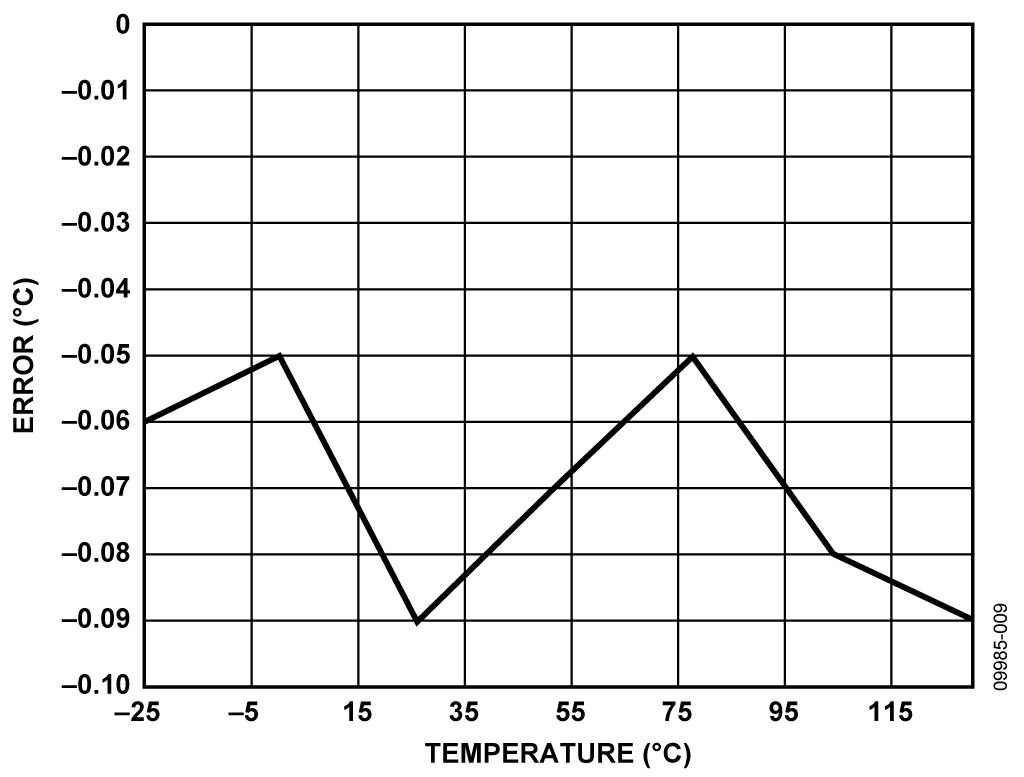
Circuit function and advantage This circuit shows how to use a precision analog microcontroller ADuCM360/ADuCM361.ADuCM360/ADuCM361 integrated dual-channel 24-bit-to-analog converter (ADC), dual-channel programmable current source, 12-digit in precision thermocouple temperature monitoring applications Analog-to-analog converter (DAC), 1.2 V internal reference, ARM Cortex-M3 core, 126 kB flash, 8 kB SRAM, and various digital peripherals such as UART, timer, SPI, and I2C interface. In this circuit, the ADuCM360/ADuCM361 is connected to a thermocouple and a 100 platinum resistance temperature detector (RTD). The RTD is used to perform cold junction compensation. In the source code, the ADC sample rate is chosen to be 4 Hz. When the ADC input programmable gain amplifier (PGA) has a gain configuration of 32, the ADuCM360/ADuCM361 has a noise-free code resolution greater than 18 bits. Building a USB-based temperature monitor (CN0221) with a precision analog microcontroller ADuCM360 and an external thermocouple Figure 1. ADuCM360/ADuCM361 is used as a temperature monitoring controller and thermocouple interface (schematic diagram, not shown) Figure 1. ADuCM360/ADuCM361 is used as a temperature monitoring controller and thermocouple interface (schematic diagram, not shown) Circuit description The following features of the ADuCM360/ADuCM361 are used in this application: - In software, a 24-bit ∑-Δ ADC with 32x PGA gain for thermocouples and RTDs. ADC1 continuously switches between thermocouple signal sampling and RTD voltage signal sampling. - Programmable excitation current source to drive controlled current through the RTD. Dual channel current source can be configured from 0A to 2mA. This example uses the 200A setting to minimize errors caused by the RTD self-heating effect. - The ADC in the ADuCM360/ADuCM361 has a built-in 1.2V reference. Its internal reference has high accuracy and is suitable for measuring thermocouple voltage. - The ADC in the ADuCM360/ADuCM361 has an external voltage reference. It measures the RTD resistance; it uses a ratiometric setting to connect an external reference resistor (RREF) to the external VREF+ and VREF pins. - Bias Voltage Generator (VBIAS). VBIAS is used to set the thermocouple common mode voltage to AVDD/2. - ARMCortex-M3 core. The powerful 32-bit ARM core integrates 126kB of flash and 8kBSRAM of memory to run user code, configure and control the ADC, handle ADC conversion via RTD, and control UART/USB interface communication. - The UART is used as a communication interface with the host PC. - Two external switches are used to force the device into flash boot mode. With SD low and the RESET button switched, the ADuCM360/ADuCM361 enters boot mode instead of normal user mode. In boot mode, the internal flash memory can be reprogrammed via the UART interface. Thermocouples and RTDs generate very small signals, so PGAs are needed to amplify these signals. The thermocouple used in this application is a T (copper-constantan) type with a temperature range of ? 200°C to +350°C. Sensitivity is approximately 40V/°C, which means the ADC can cover the entire temperature range of the thermocouple in bipolar mode and 32x PGA gain setting. The RTD is used to perform cold junction compensation. This circuit uses a platinum 100Ω RTD model Enercorp PCS 1.1503.1. It is packaged in a 0805 surface mount package. The rate of temperature change is 0.385 Ω / ° C. Note that the reference resistor RREF should be a precision 5.6kΩ (±0.1%) resistor. The USB interface of the ADuCM360/ADuCM361 is implemented by the FT232R UART to USB transceiver, which converts the USB signal directly into a UART. In addition to the decoupling shown in Figure 1, the USB cable itself must also use ferrite beads to enhance EMI/RFI protection. The ferrite bead used in this circuit is Taiyo Yuden #BK2125HS102-T, which has an impedance of 1000 Ω at 100 MHz. This circuit must be built on a multilayer printed circuit board (PCB) with a large area ground plane. For optimum performance, proper layout, grounding, and decoupling techniques should be used (see Tutorial MT-031--Making Data Converter Grounding and Unlocking the Mystery of "AGND" and "DGND", Tutorial MT-101- - Decoupling technology, and ADuCM360TCZ evaluation board layout). The PCB used to evaluate the circuit is shown in Figure 2. Building a USB-based temperature monitor (CN0221) using the precision analog microcontroller ADuCM360 and an external thermocouple. Figure 2. EVAL-ADuCM360TCZ board used in this circuit. Figure 2. EVAL-ADuCM360TCZ board used in this circuit Code description The source code used to test this circuit can be downloaded from the ADuCM360 product page (zip compressed file). The UART is configured with a baud rate of 9600, 8 data bits, no polarity, no flow control. If this circuit is directly connected to the PC, you can use the communication port view program such as HyperTerminal to view the results sent by the program to the UART, as shown in Figure 3. Figure 3. Output of the "HyperTerminal" communication port viewer Measure the temperature of the thermocouple and RTD to obtain a temperature reading. The RTD temperature is converted to its equivalent thermocouple voltage by a look-up table (see ISE's ITS-90 T-type thermocouple meter). These two voltages are added to give the absolute temperature value of the thermocouple. First, V1 is the voltage measured between the two wires of the thermocouple. The RTD voltage is measured and converted to a temperature value by a lookup table, which is then converted to its equivalent thermocouple voltage (V2). Subsequently, V1 and V2 are added to obtain the total thermocouple voltage value, which is converted to the final temperature measurement. Building a USB-based temperature monitor (CN0221) with a precision analog microcontroller ADuCM360 and an external thermocouple Figure 4. Errors when using simple linear approximation Figure 4. Errors when using simple linear approximation Initially, this conversion was based on a simple linear assumption: the temperature of the thermocouple is 40V/°C. As can be seen from Figure 4, only for a small range of temperatures around 0°C, the error caused by this conversion is Accepted. A better way to calculate the thermocouple temperature is to use a 6th order polynomial for positive temperatures and a 7th order polynomial for negative temperatures. This requires mathematical operations, resulting in an increase in computation time and codeword size. A suitable trade-off is to calculate the corresponding temperature for a fixed number of voltages, and then store these temperatures in an array, the values ​​between which are calculated using linear interpolation of adjacent points. As can be seen from Figure 5, the error is significantly reduced when using this method. Figure 5 shows the algorithm error using the ideal thermocouple voltage. Building a USB-based temperature monitor (CN0221) with a precision analog microcontroller ADuCM360 and an external thermocouple Figure 5. Errors when using piecewise linear approximation Figure 5. Errors when using piecewise linear approximation Figure 6 shows the error produced by measuring the 52 thermocouple voltages in the full thermocouple operating range using ADC1 on the ADuCM360. The overall maximum error is <1 °C. Building a USB-based temperature monitor (CN0221) with a precision analog microcontroller ADuCM360 and an external thermocouple Figure 6. Errors when using piecewise linear approximation (52 calibration points measured with ADuCM360/ADuCM361) Figure 6. Errors when using piecewise linear approximation (52 calibration points measured with ADuCM360/ADuCM361) Like thermocouples, RTD temperatures can be calculated and implemented using lookup tables. Note that the polynomial describing the relationship between RTD temperature and resistance is different from the polynomial describing the thermocouple. For more information on linearization and achieving the best performance of RTDs, please refer to application note AN-0970: Implementing RTD Interfaces and Linearization with the ADuC706x Microcontroller. Circuit evaluation and testing For test and evaluation circuits, thermocouple measurements and RTD measurements are evaluated separately. Thermocouple measurement test The basic test setup is shown in Figure 7. The thermocouple is connected to J5. The J1 jumper must be installed to make the thermocouple common-mode voltage setting for the AIN7/VBIAS pin. The board gets power from the PC's USB connection. Two methods are used to evaluate the performance of this circuit. First measure the temperature of the ice bucket using a thermocouple connected to the board and then measure the temperature of the boiling water. The Wavetek 4808 Multifunction Calibrator was used to fully evaluate the error, as shown in Figures 4 and 6. In this mode, the calibrator replaces the thermocouple as a voltage source, as shown in Figure 7. To evaluate the entire range of T-type thermocouples, use a calibrator to set up a T-type thermocouple? An equivalent thermocouple voltage of 52 points between the positive and negative temperature ranges of 200 ° C to +350 ° C. (See ISE's ITS-90 T-type thermocouple meter). To evaluate the accuracy of the lookup algorithm, the 551 voltage reading (equivalent temperature range: ?200 ° C to +350 ° C, interval +1 ° C) is sent to the temperature calculation function. Figures 4 and 5 show the errors calculated by the linear method and the piecewise linear approximation method. Building a USB-based temperature monitor (CN0221) with the precision analog microcontroller ADuCM360 and an external thermocouple Figure 7. Settings for calibrating and testing the circuit over the complete output voltage range of the thermocouple Figure 7. Settings for calibrating and testing the circuit over the complete output voltage range of the thermocouple RTD measurement test To evaluate the RTD circuit and linearize the source code, replace the RTD on the board with a precisely adjustable source resistance. The instrument uses a 1433-Z Decade Resistor. RTD value between 90Ω and 140Ω, which represents the RTD temperature range? 25 ° C to +114 ° C. Figure 8 shows the test setup circuit and Figure 9 shows the error results for the RTD test. Building a USB-based temperature monitor (CN0221) with a precision analog microcontroller ADuCM360 and an external thermocouple Figure 8. Test setup for measuring RTD errors Figure 8. Test setup for measuring RTD errors Figure 9. RTD measurement error, expressed in °C (measured with piecewise linear code and ADC0) plastic keychains wholesale,plastic keychain craft,plastic keychain diy,plastic keychain tags,custom plastic keychains Shenzhen Konchang Electronic Technology Co.,Ltd , https://www.konchangs.com